
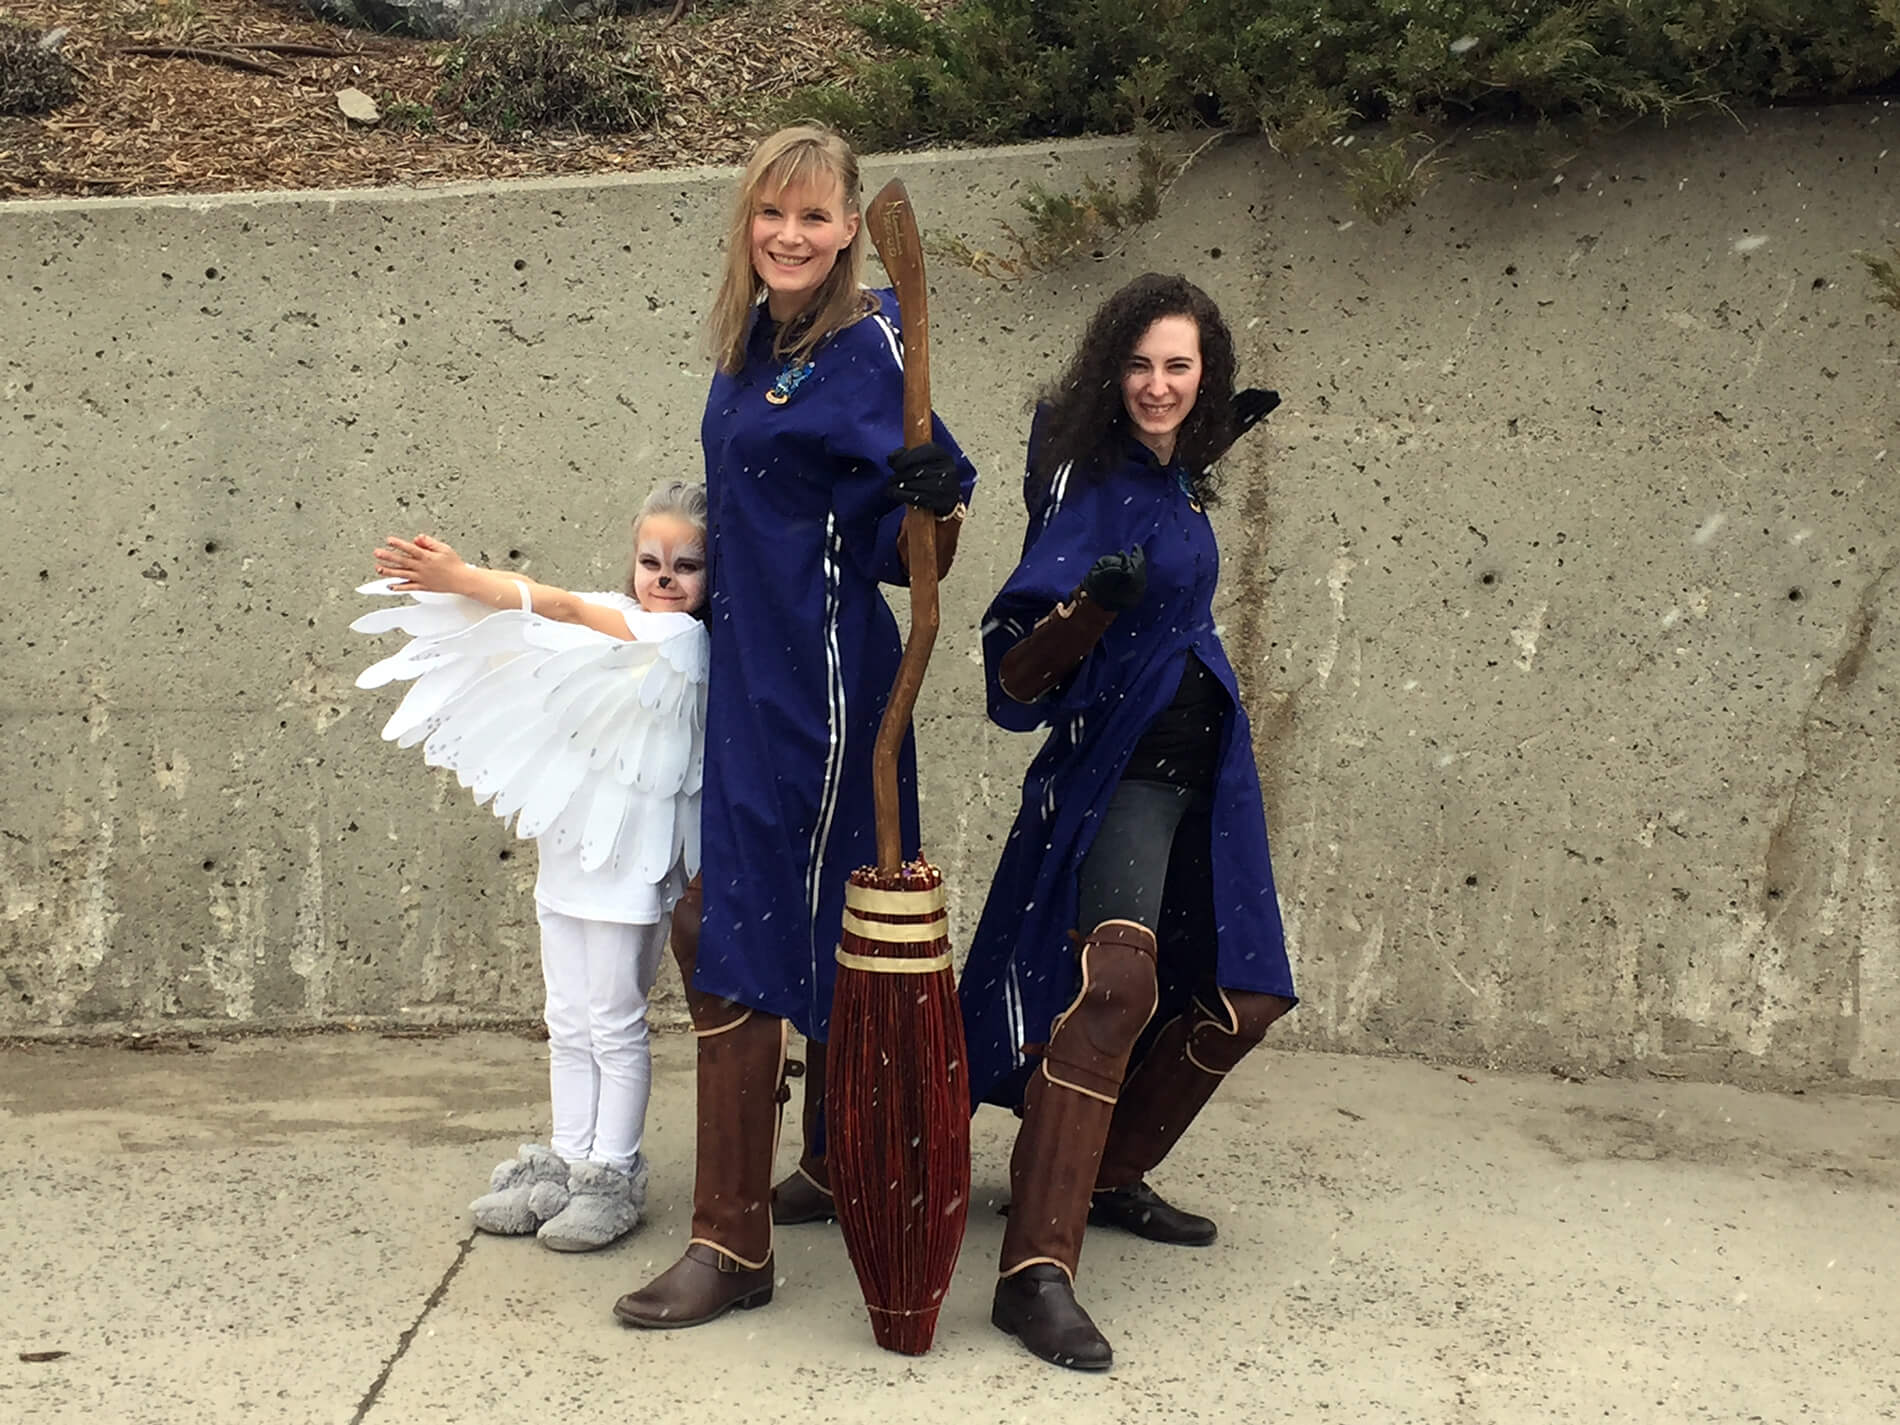
Quidditch is THE sport in Harry Potter. A combination of soccer and football played on broomsticks. Sound dangerous? Of course not! Never mind the broken bones, concussions, black eyes, and hundred-foot falls. It’s a piece of cake!
” Our job is to make sure that you don’t get bloodied up too badly! Can’t make any promises. Rough game, Quidditch.”
George Weasley
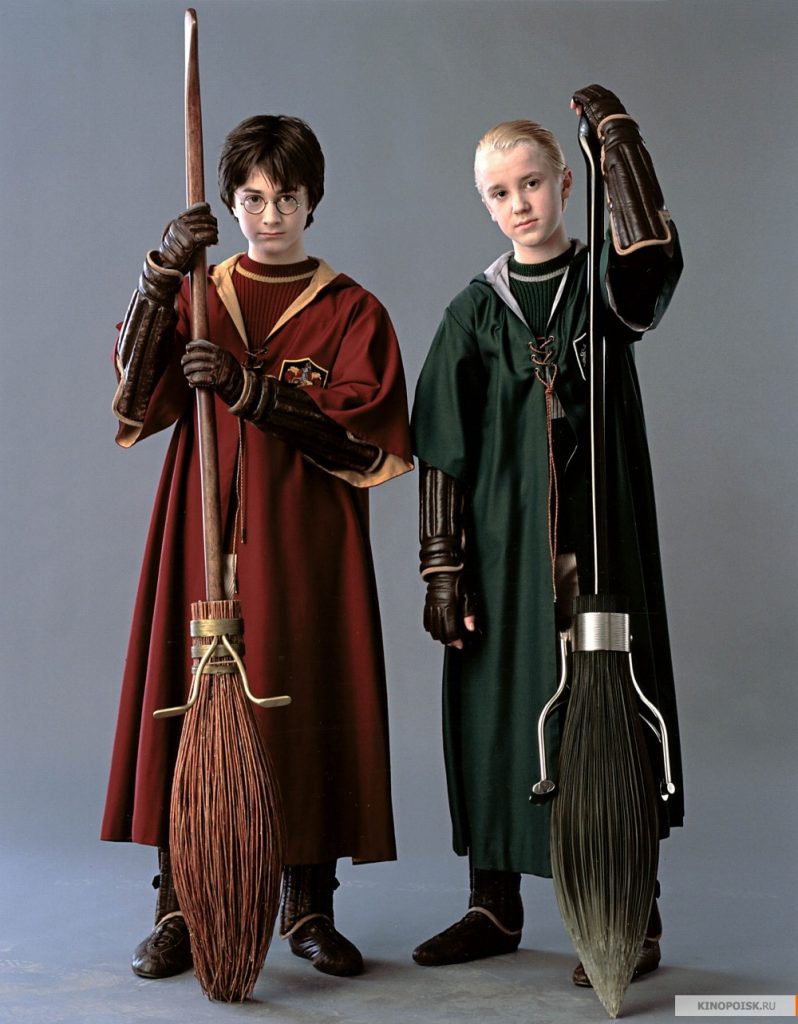
What’s that you say? You don’t recall what a Quidditch outfit looks like? No problem, just check out Harry and Draco below. As long as you have your protective gear, a robe, and a broom, you’re off to the races. No pun intended (I think). Or, if you’re looking for a more detailed look into getting kitted out for Quidditch, read up on it in my Quidditch Costume Reference post.
Getting Started
Step 1 for me in making a new costume is copious amounts of research. There are so many questions to answer! Like how many variations of the costumes are there? Does each House have slight variations or do they all follow the same pattern? How do Quidditch players get assigned numbers? Did the costumes evolve through the series? The questions usually get more detailed as the picture becomes clearer. My last questions are usually things like “Which type of metal are the buckles made of?”
This time, there were so many questions and details that I ended up turning my research and sketches into its own post: A Quidditch Costume Reference. I also discovered a lovely book that’s still on my wish list called “Harry Potter: The Character Vault” which is perfection for anyone wanting to do Harry Potter cosplay. There were several pages on Quidditch, along with original costume sketches and photos. It made my heart all giddy inside.
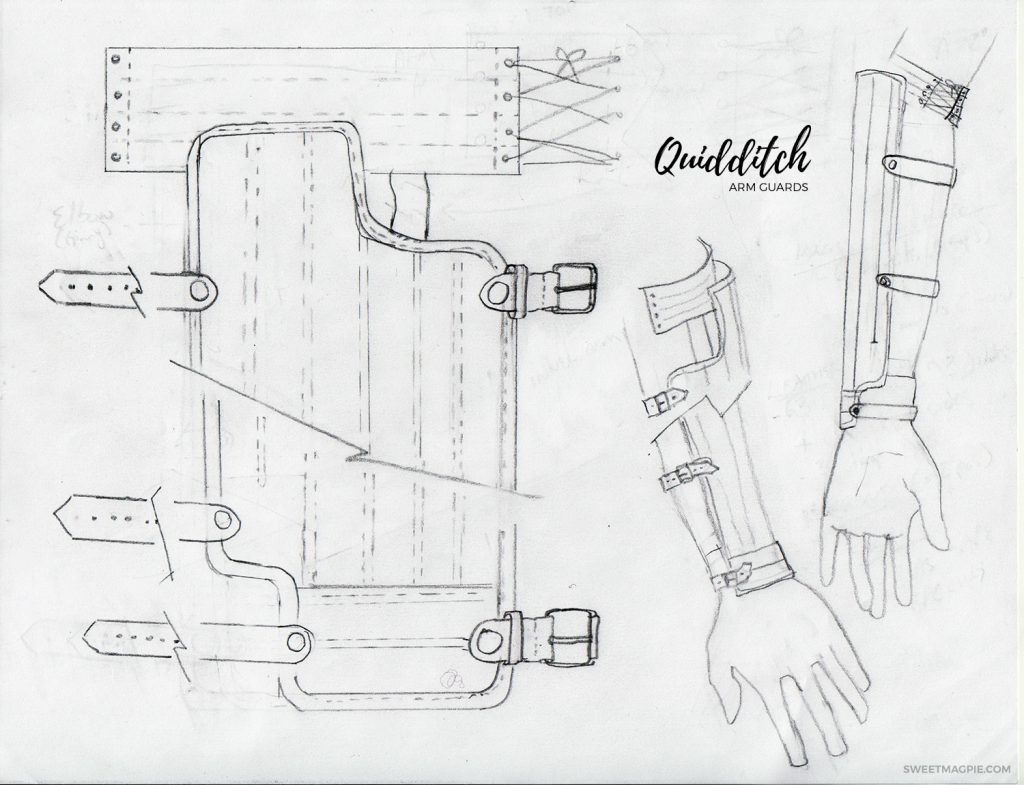
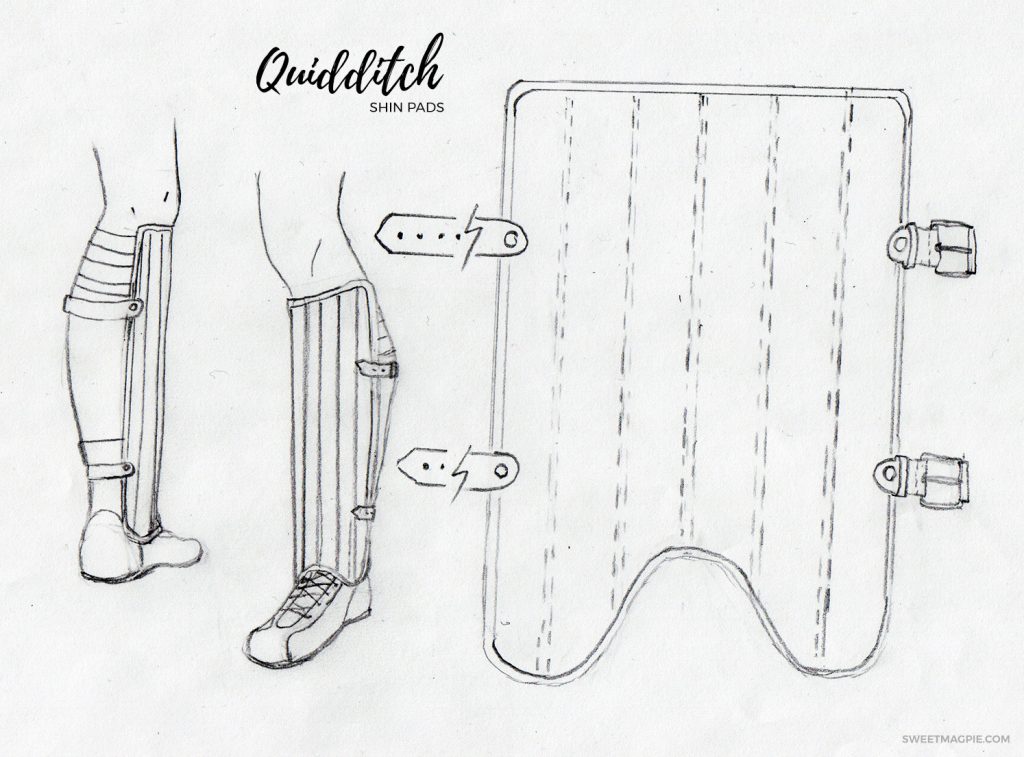
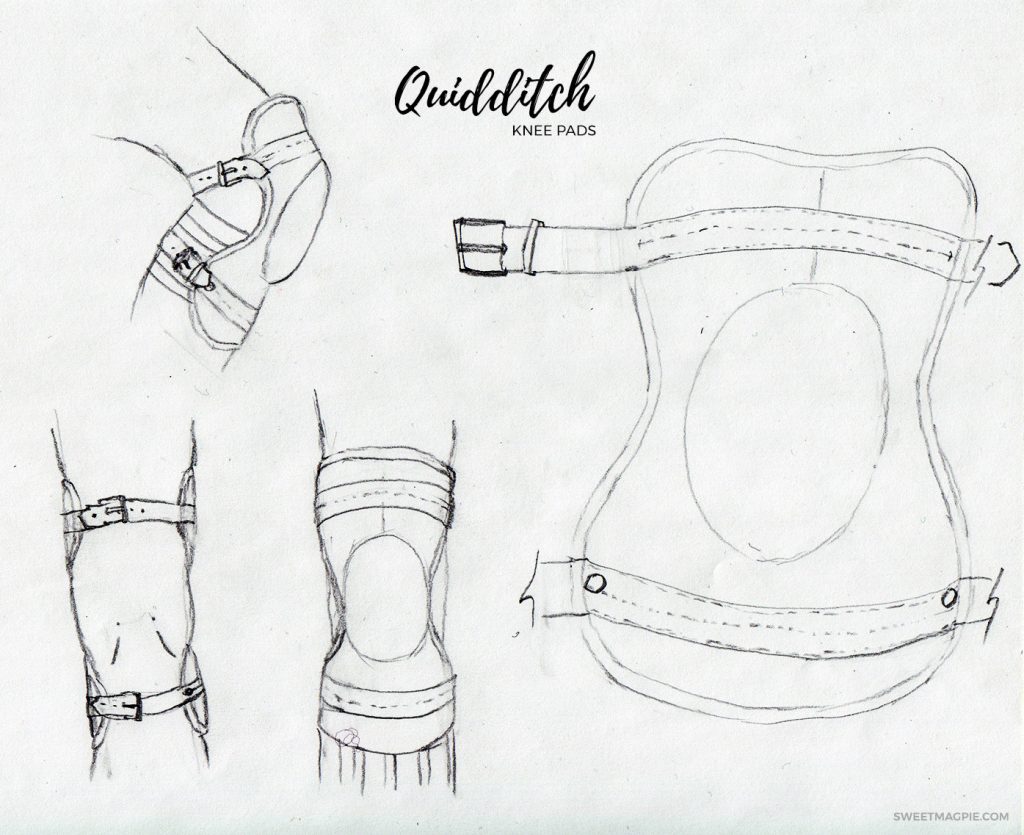
Based on the digging I’d done, I came up with a few sketches to start things off:
Sourcing Materials
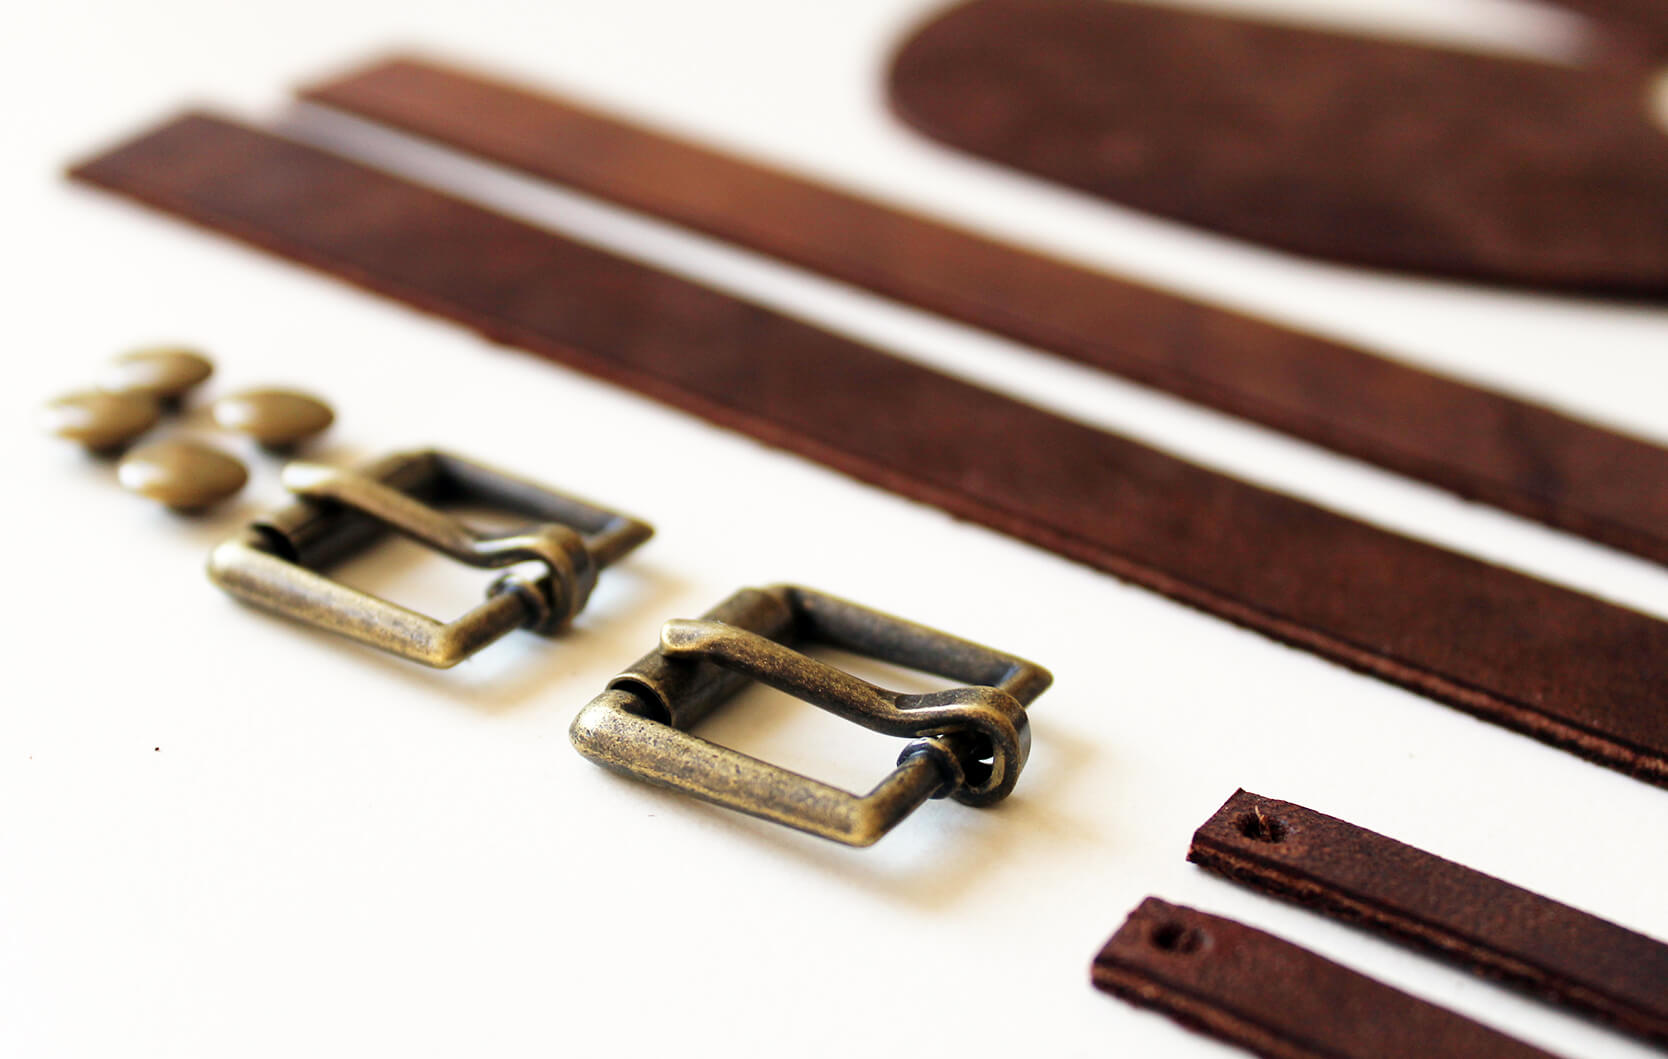
The original Quidditch armor in the movies was made of leather, backed in linen, with tan edging and brass-looking buckles. The leather was soaked and molded to shape before stitching. Some of the later costumes (year 6 tryouts) used airbrushed foam instead (source: Harry Potter: The Character Vault). Since I haven’t worked much with foam and don’t own an airbrush, leather seemed the obvious way to go.
Never one to go halfway on a project, I tried to make both the patterns and look as close to real-life as possible. Our local Tandy Leather store was a huge help in figuring out how to buy leather, which hardware would work best, and other supplies I might need. My shopping list ended up looking something like this:
Leather Store:
- Oiled brown leather (1/2 a utility side), 5 oz (2mm) thickness
- 14 x 5/8” (16mm) Roller Strap Buckles in Antique Brass
- 100 pack of Rapid Rivets in Antique Brass – 5/16″ (8 mm) cap
- 100 pack of Eyelets in Antique Brass – 3/16” (5mm)
- Leather Punch, hole sizes 1 and 2
- Rivet Setter
- Leather Glue
Fabric Store:
- 1-2 yards backing fabric – canvas, linen, or similar
- 1/4″ Double fold bias tape in taupe/beige, 12 yards
- Thread to match your leather
- Thread to match your bias tape
- Double sewing needle attachment
- Pillow stuffing
Hardware Store:
- Wooden doweling – 8 pieces, approx 3/4” diameter and 16” long
How To Put It Together
I’d recommend starting by printing out the Quidditch Gear pattern, below. Then tape the pages together for the knee pad, arm guard, and shin guard.
Download the Quidditch Gear Pattern (free)
Now you get to the fun part: measuring yourself! Jot down your measurements to make sure the finished gear will fit:
- Around your arm just below the bicep
- The widest part of your forearm
- From your wrist crease to the end of your elbow
- Around your wrist
- The widest part of your calf
- The top of your foot to the bottom of your kneecap
If the pattern is too big or small, you can do some cutting/taping of the pattern to shrink or expand it to a size that will work with your measurements.
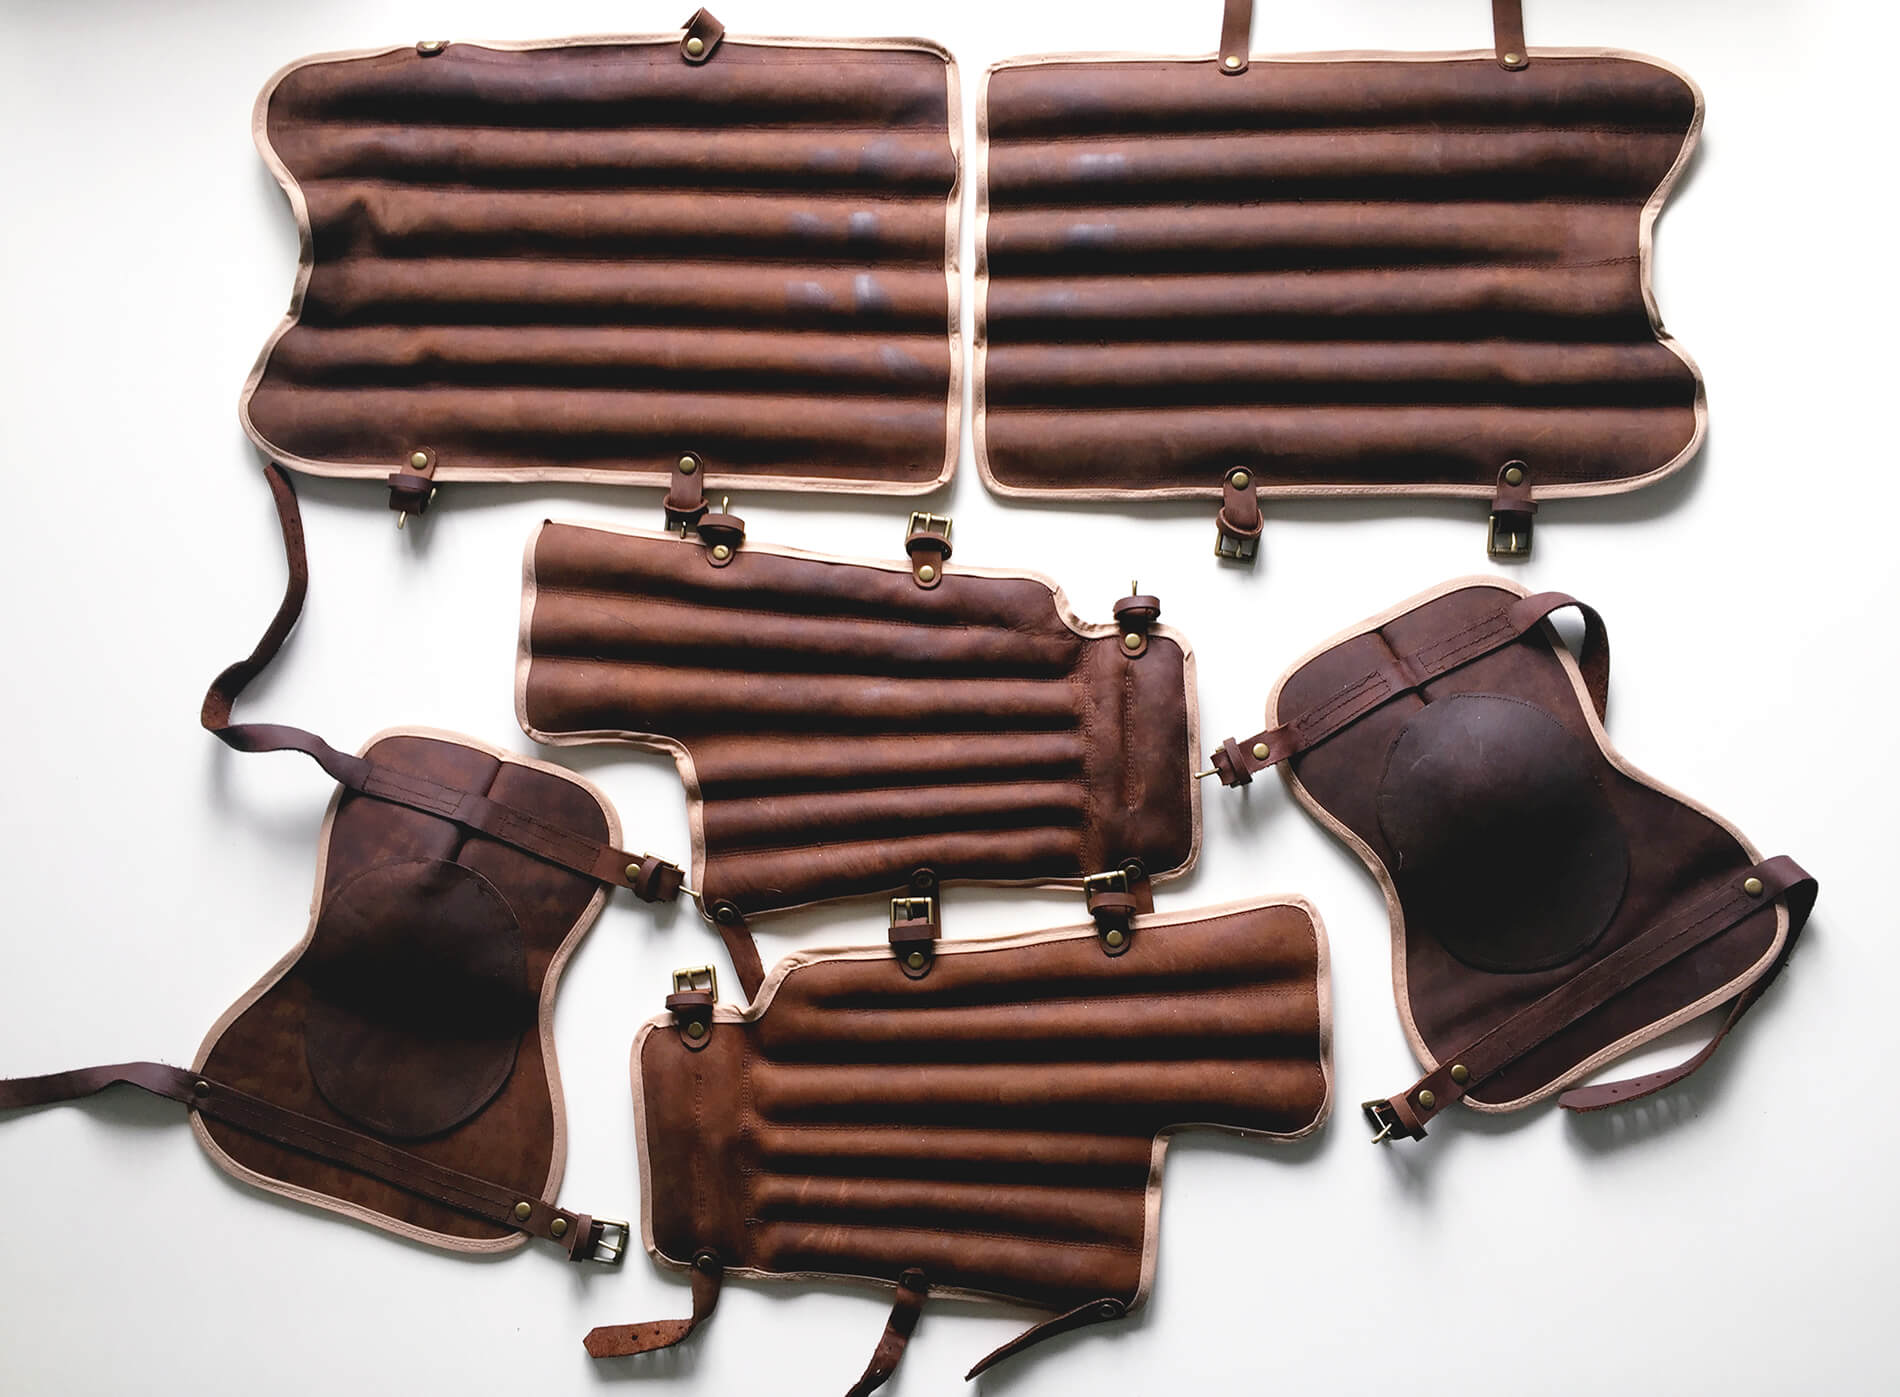
Once you’ve got the pieces to size, cut your leather and backing fabric as directed in the pattern. You’ll need 2 of most pieces, a lot of straps, and don’t forget to reverse the pattern when cutting your arm guards!
Next comes the internal stitching. For the knee pad this is sewing the tops together and attaching the knee cap. For the arms and legs, you’re stitching the channels where the stuffing will go.
A few tips for stitching the arm and leg guards:
- Stitching with the leather on top and backing on the bottom hides any bobbin thread issues
- Use binder clips instead of pins to keep the backing on the leather while sewing. Pins don’t go through well and leave holes in the leather
- A double needle (a new experience for me) is a lifesaver for making neat parallel lines in the arm and leg guards
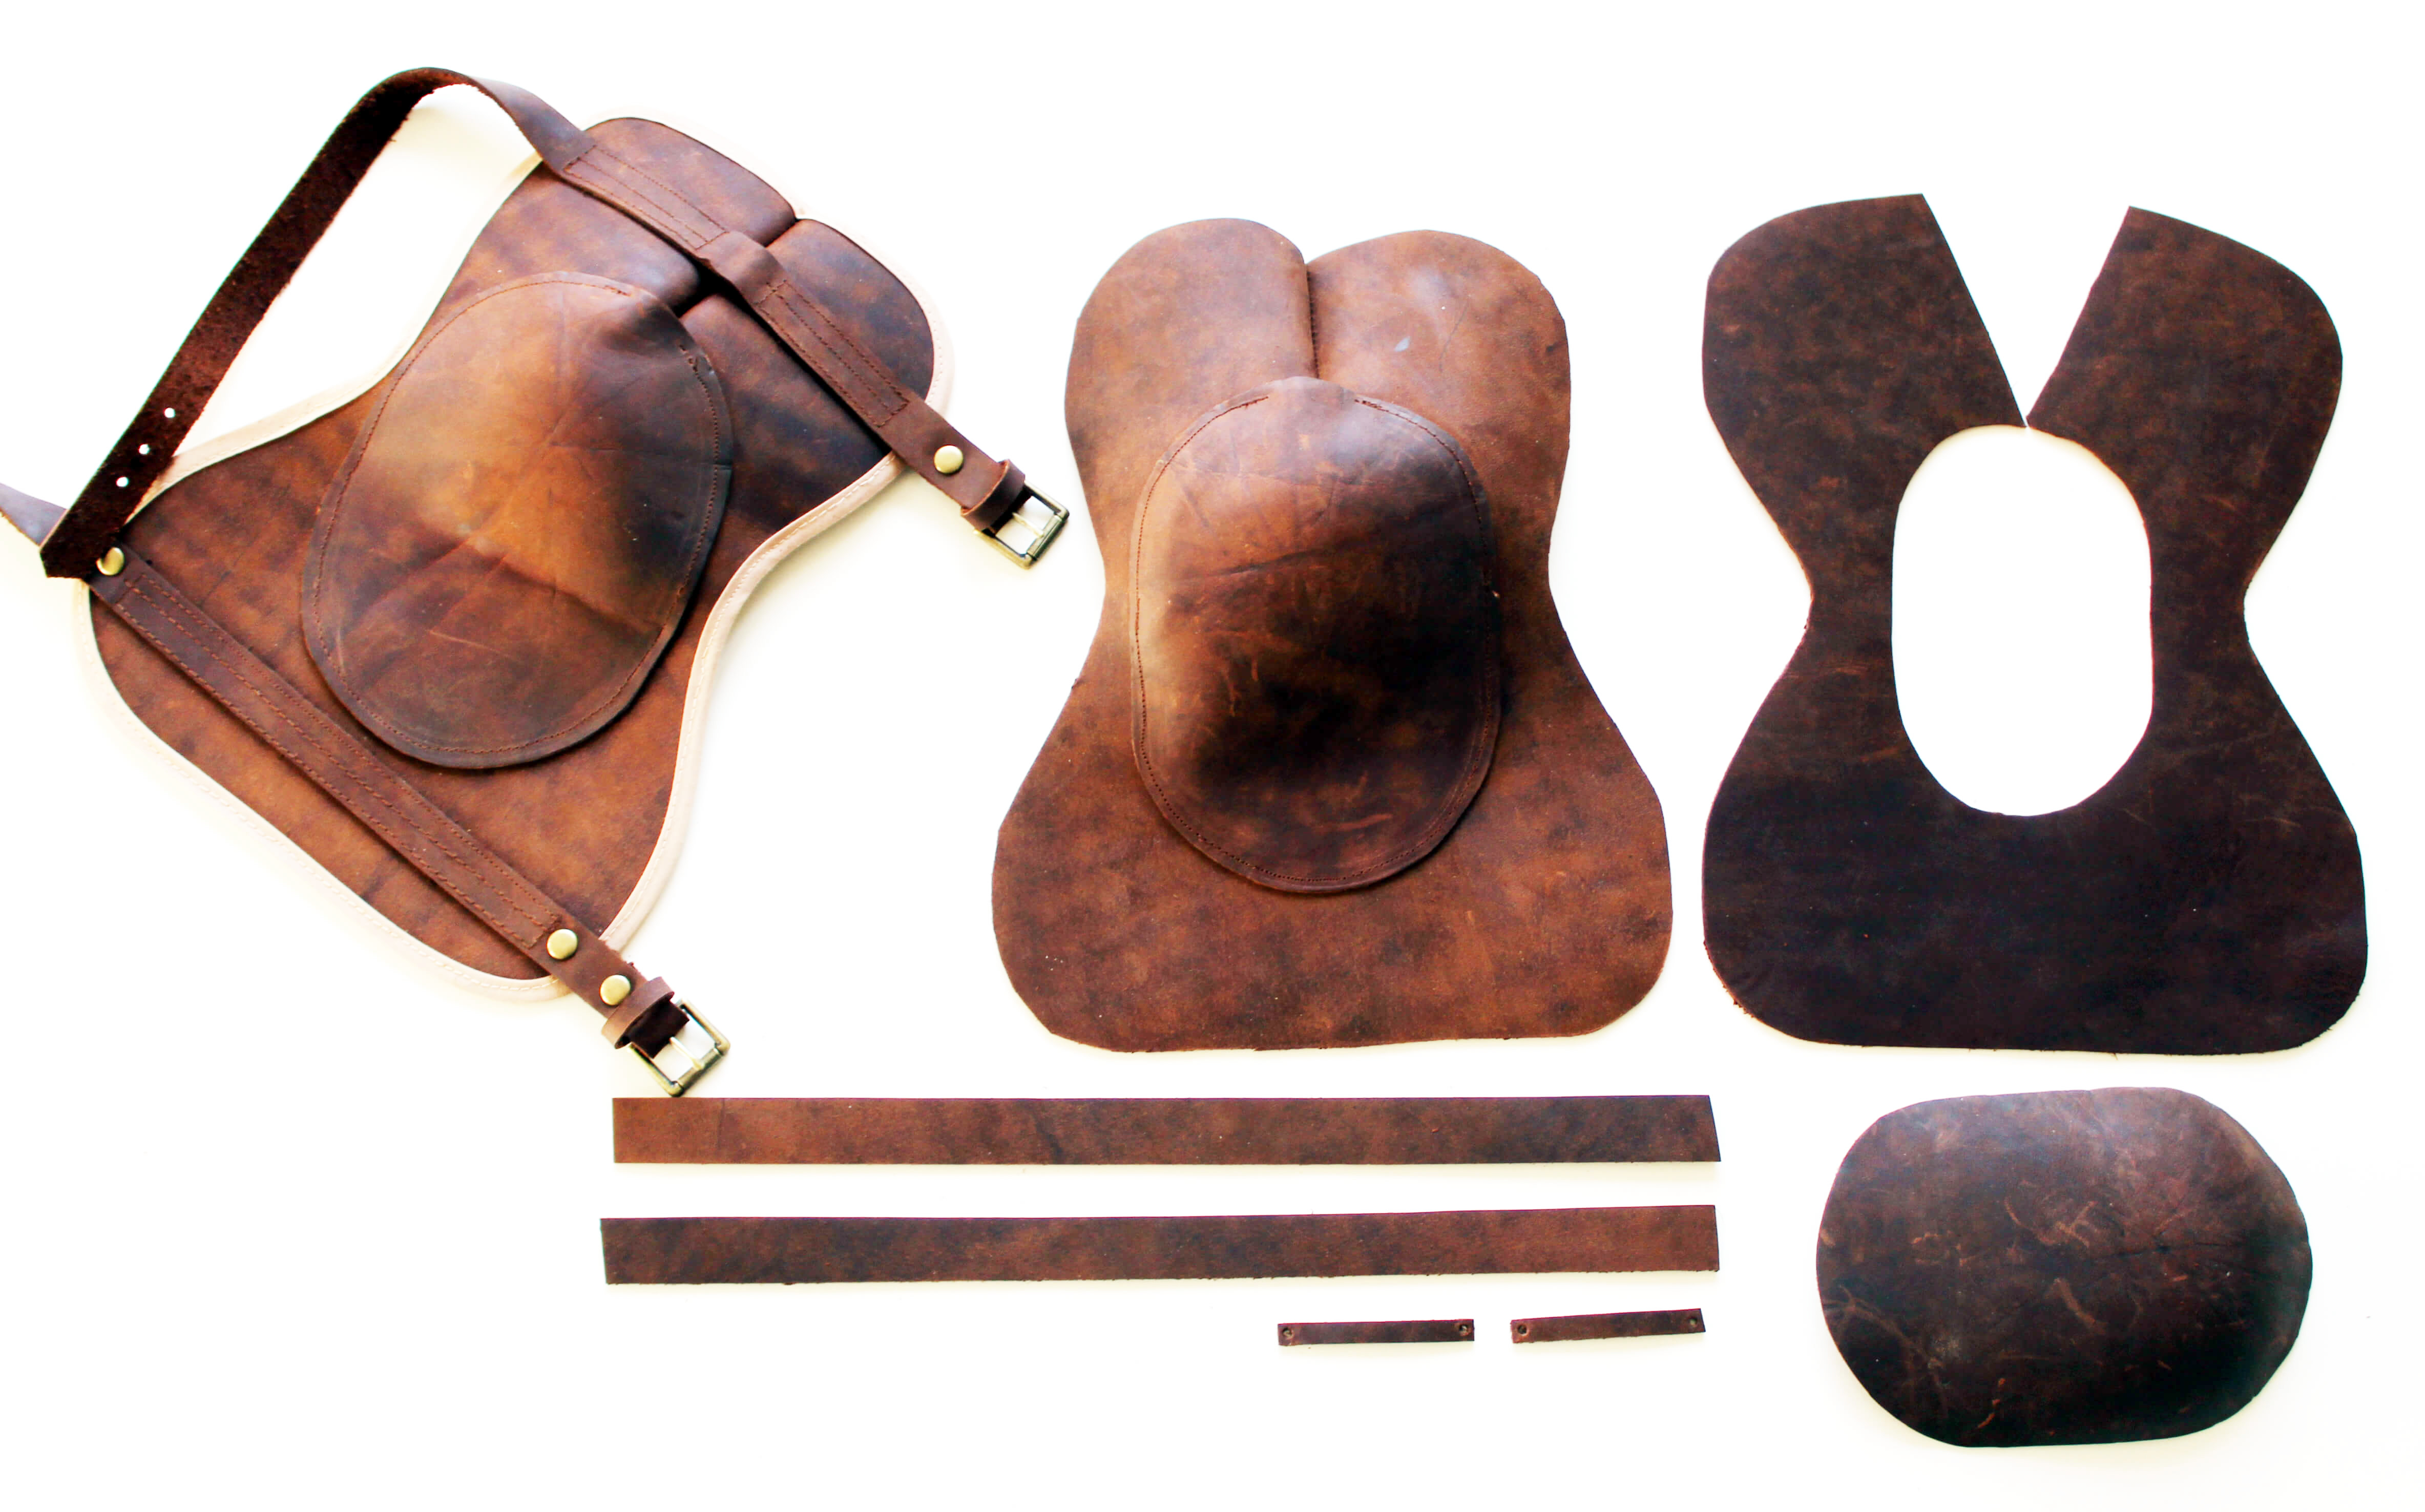
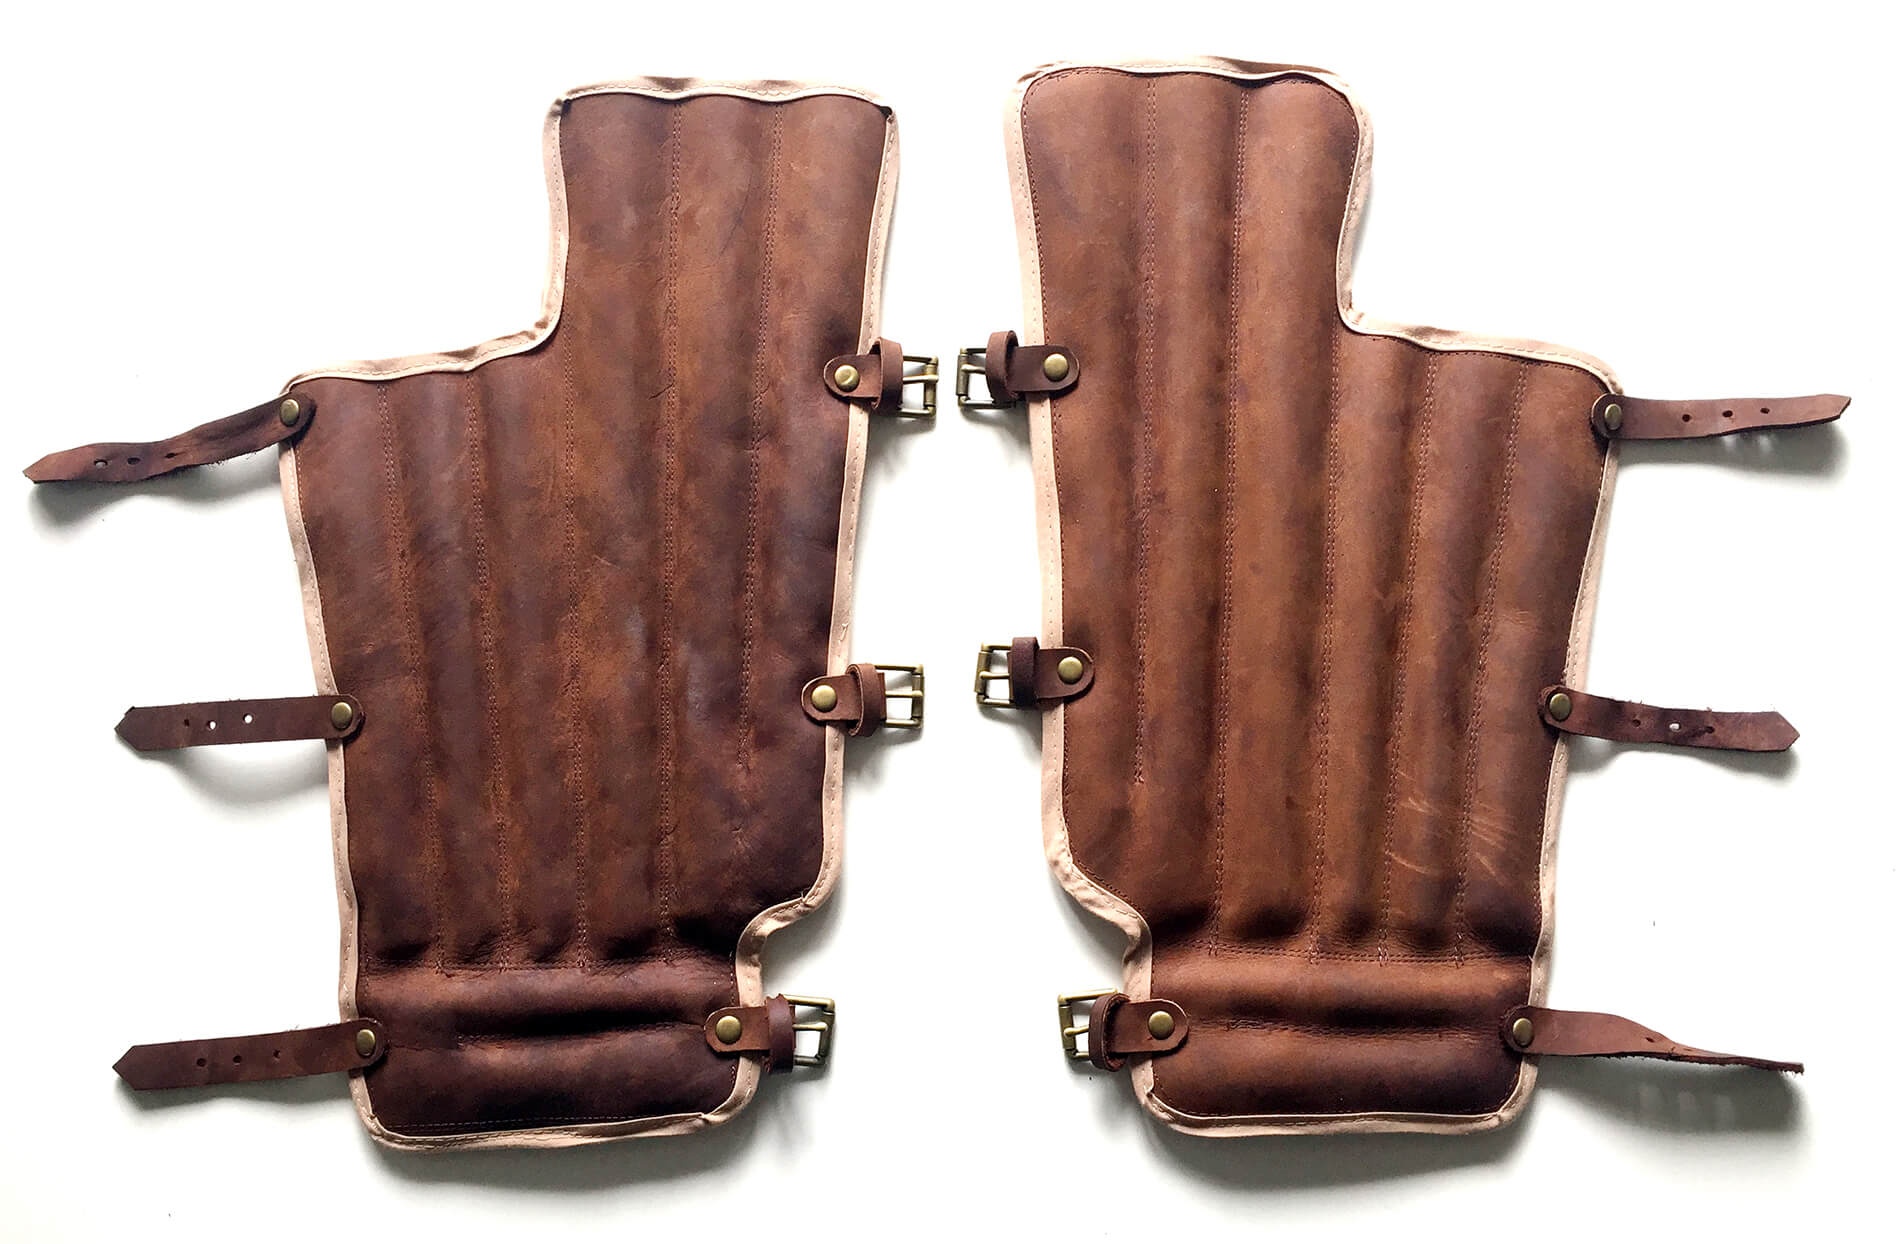
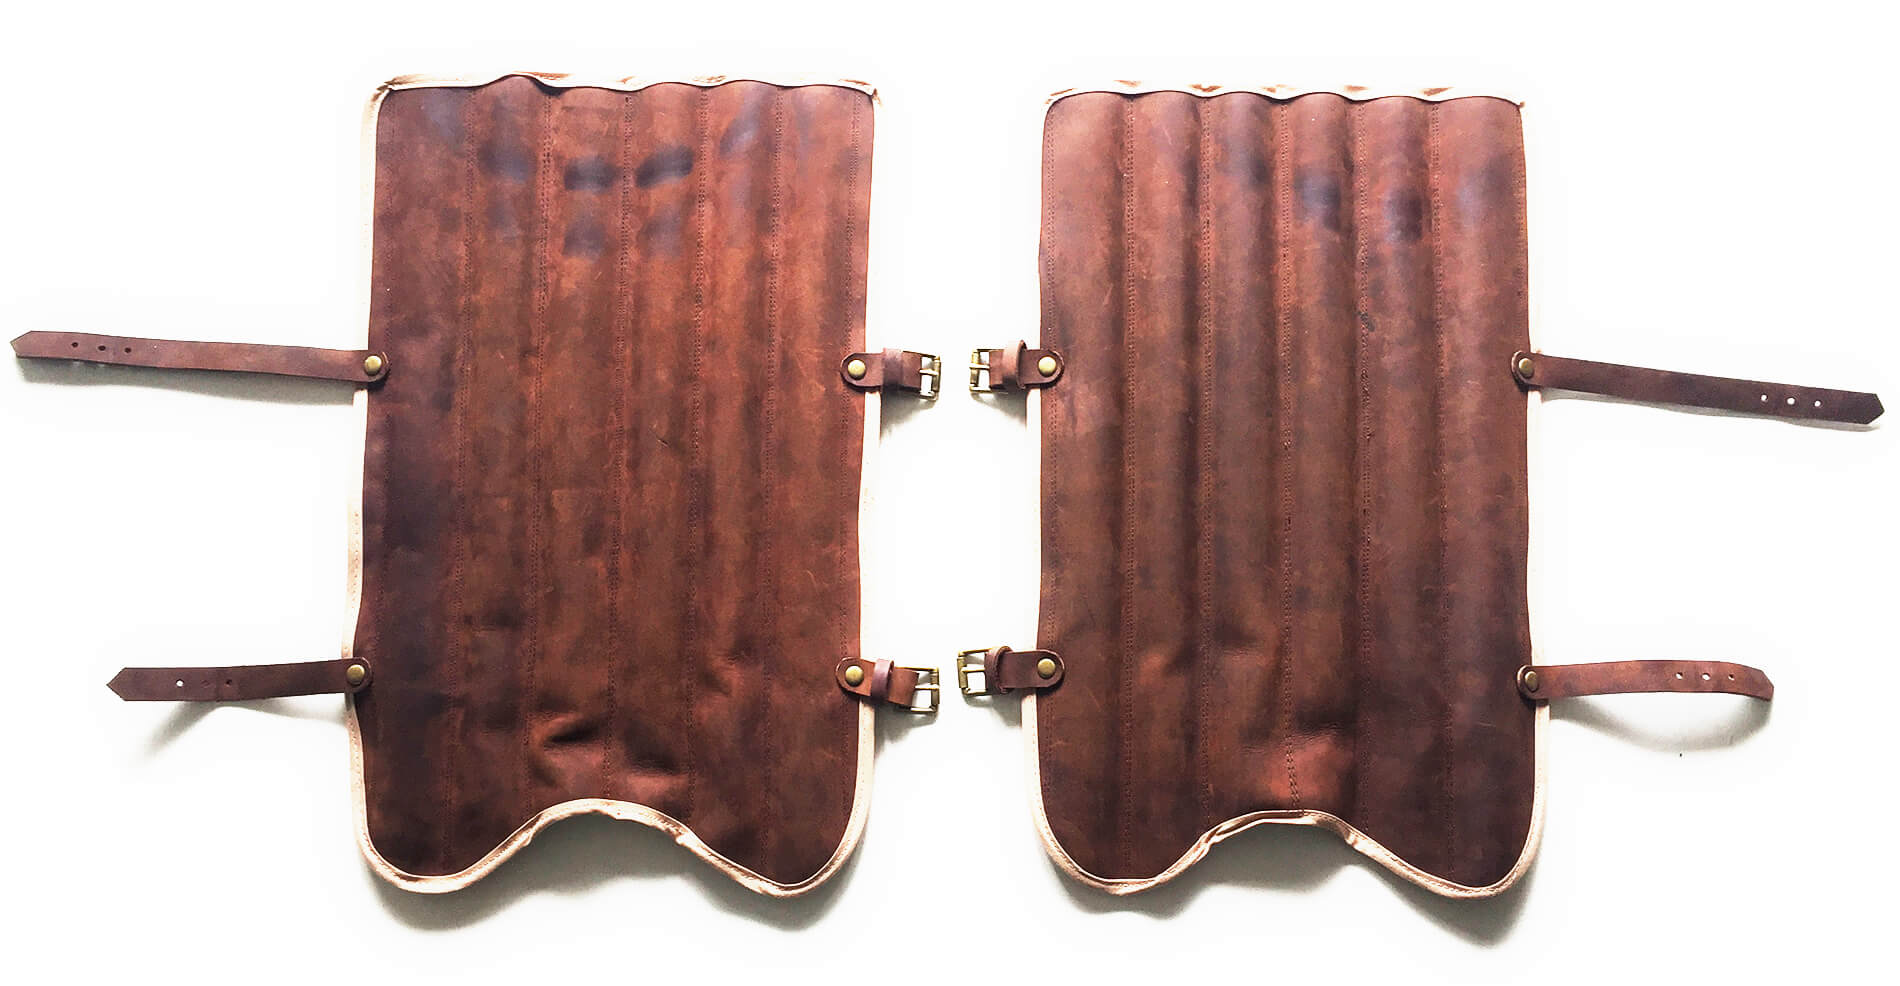
Once you’ve got the stitching done, it’s time to stuff the arm and leg guards. I tried stuffing them with cotton but the leather didn’t bend enough to look puffy. Frustrating! I found that soaking the leather for 30 minutes and then stuffing the channels with dowels let the leather hold its shape quite nicely. I waited for about a day to let it dry before re-stuffing.
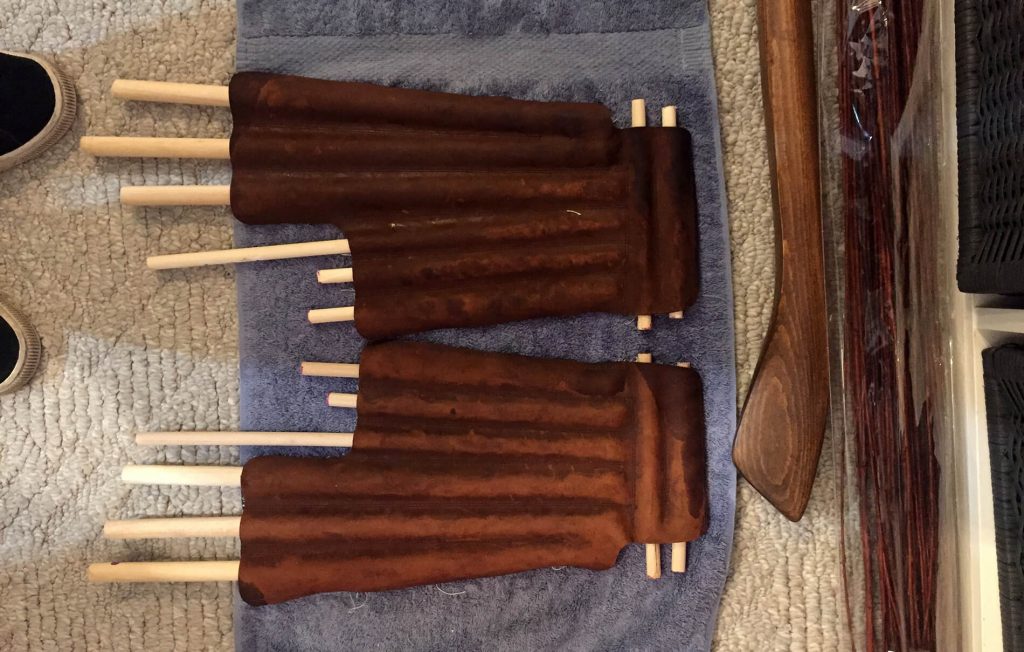
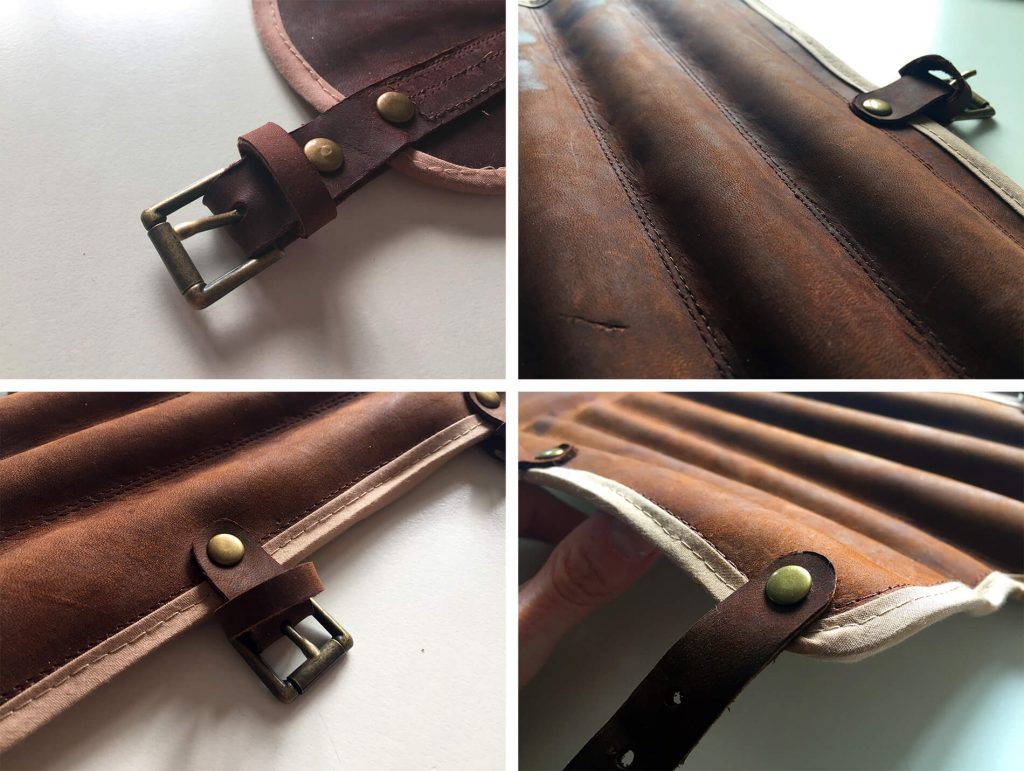
Now that the internal stitching and stuffing is done, you can sew your bias tape around the edges of each piece. After that, there’s a lot of hole punching and riveting to finish and set your straps. Here are a few closeups to show the general idea:
After All That…
Once you’ve got your buckles and straps on, make sure you sit down with a cup of tea and pat yourself on the back for a job well done. Because you’ll be ready to roll in your new Quidditch armor.

Other Quidditch Gear Tutorials
If this seems too complicated or like way too much work (it’s not a quick project), check out these other lovely tutorials I came across:
- Kaisadani – used an old leather jacket for material, and an old t-shirt to create the padding. She has some great WIP photos.
- Sasa Maki Cosplay – she used a process quite similar to mine and has a great youtube video on how to assemble things
- Snapdragon Designs – shows how to draft a basic pattern from scratch, uses lambskin around the edges (a nice alternative to bias tape)
- The Leaky Cauldron – Uses pre-made nylon straps to speed things up
- Skazun on Instructables – makes bracers using heavy-duty leather
6 replies on “DIYing your own Quidditch gear”
Thanks so much for posting all your research, patterns, and other information! So very generous and helpful! A Slytherin Year Six uniform is on my daughter’s wishlist for Halloween this year, and this is just the sort of guidance I needed to get started!
Aw, you make me blush! I’m so glad you found my posts and sketches useful. I’m a big fan of the year 6 quidditch robe myself. Happy making! Do let me know how it turns out 😁
Could you possibly post either where you got your ravenclaw robes or the pattern you used to make them? I can’t find a set of ravenclaw quidditch robes for the life of me. They were never shown in the movies so no one makes them. I can do some sewing but I’m useless at creating my own pattern.
My friend Kim eyeballed them and made up the pattern for our robes, so unfortunately I can’t share the pattern I used.
Simplicity has an official Harry Potter robe pattern you might be able to use: https://www.simplicity.com/simplicity-storefront-catalog/patterns/costumes/simplicity-pattern-8723-harry-potter-unisex-costumes/ or Claire shared her home made pattern at http://www.clairesanders.net/2011/10/wizard-robe.html
I made a template for the names and numbers to go on the back of your robes, which you can download for free here: https://boulianne.net/maker/quidditch-robe-numbers/ and I also have a blog post detailing the parts of the costume and what they look like, for reference: https://boulianne.net/maker/a-quidditch-costume-reference/
I hope this helps!
any chance I could possibly purchase a set of vambraces, knee pads and shingaurds from you? I have George weaslys screen used quidditch robe from the third film and these in all of the internet seem to be the most accurate to the screen used ones and I would love to purchase these to display with my costume since its missing them
Thanks for the compliment! I’ve been mulling your request over, as I only have the one set of Quidditch gear and am not planning on making another set due to the amount of time and effort they took to create (50+ hours). I’m not sure I’m ready to part with them yet. I appreciate your interest, however!