The year my father turned 70 I knew I wanted something over-the-top for his birthday gift. This is the tale of how I made a scale(ish) model of the skyway sign from Back To The Future and knocked his socks right off.
By now I’m assuming that you know I have this thing for Back To The Future (I might have mentioned it before in my sweet hoverboard costume post). But did you know that my dad gets the same grin on his face if you bring up Back To The Future?
When I was young my mom would spend a few weekends a year away at teacher’s conferences. This left 3 girls home alone with dad. Being the model parent that he is, the first thing we did Friday after school was head over to Blockbuster to rent several VHS tapes and a VCR. Crazy, right?
Those movie weekends were my first introduction to Back To The Future. Over the years we watched and re-watched the Back To The Future movies, first on VHS, then on DVD. There was just something so right about the clever dialogue, the over-the-top future predictions, and the way the stories of all three movies were woven together that we just couldn’t get enough of.
Now Dad had recently invested in an HO scale railway track for his basement. The idea was to give it a Back To The Future theme, featuring different levels for different eras – 1955 at table height, the old west complete with Clayton Shonash Ravine above, and some flying cars (a DeLorean was a must-have!) hovering over it all. This situation made giving him something related to both Back To The Future and his train scene ideal.
If you’ve ever met my father you’ll know he’s very hands-on and loves to build. But only if it feels substantial. Give him a deck to build, a shed to put together, or a bench to plan and he’s on it. But give him something small and finicky – like model painting – and he’s more like Biff on that second coat of wax.
Now, what would my father love to have but hate to make and couldn’t buy? What’s that you said? A skyway sign to go with his hovercars? Wow! Absolutely brilliant.
Okay, let’s go over the plan.
Every project starts out this way. You figure ‘hey, I really want to make that’ and then have to turn this great idea into a how-to-do-it plan. This time I already had a fairly good idea of how to get there.
I wanted an HO scale (more or less) sign, which is based on a 1:87 ratio from real life, so the size was easy enough to figure out. I’d done a bit of 3D modeling in college and my husband has a 3D printer hiding out in the garage, which led to the decision to design in CAD and 3D-print the sign.
Now that I had the what, I just needed to break it out into a list of how. It went something like this in my head:
- Find a CAD program to use
- Model the sign in it
- Trade my husband some peanut brittle for 3D printing. Oh, wait, he’s not George. Might have to figure something else out.
- Design the front of the sign in Illustrator
- Print the sign fronts off on sticker paper
- Put it all together.
Sounds easy, right? Right. A piece of cake. (Did someone say leftover cake? I guess uncle Joey didn’t make parole again.)
That reminds me, Marty. There’s a slight possibility of overload.
In reality, it went a little more like this:
- Ask Jeremie which CAD program to use.
- Start modeling in Onshape. Realize I didn’t know how to do nearly enough in CAD. It’s math-based and I’d only modeled graphically.
- Go through a bunch of Onshape tutorials. Get the gist of what to do and figure I should be good to go.
- Draw out each piece of the model on paper with dimensions adapted from my screenshots
- Try to make the shapes in CAD. Realize that I still know almost nothing about CAD. Do some more tutorials. Make all the big pieces – sign fronts, lights.
- Start modeling the pipes. Get fed up with it since I didn’t know how to attach them to the sign:

Please excuse the crudity of this model. I didn’t have time to build it to scale or to paint it.
This is about where I got stuck. I’d created a decent model of the various sign pieces, minus all the lovely connecting pipes and tubes that keep it from falling apart. What do you do when you get stuck? Why, of course! You drop the project for 6 months. But…
If you put your mind to it you can accomplish anything.
That’s good advice, Marty.
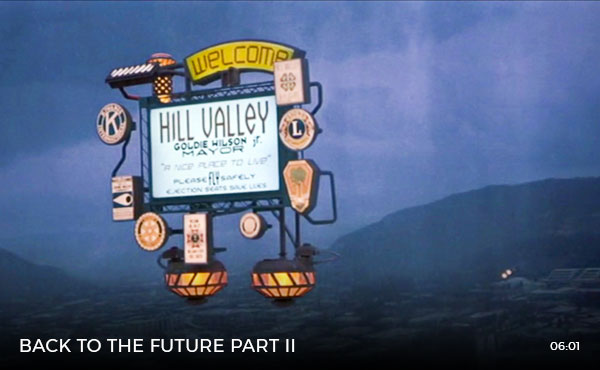
A looming deadline is always good for bringing me back to a stalled project. A few months before dad’s birthday I got a tip from @pierre_dont_care on Instagram (thank you!) that the original Skyway sign movie prop was sold on ScreenUsed. My favorite thing about ScreenUsed is the high-res photos of each prop that they leave on their site even after the item is sold. So good!

Between better photos, a fast-approaching deadline, and some extra fence ties ($9.20 at Home Depot) I found the inspiration I needed to get back on track. Once I got rolling it went something like this:
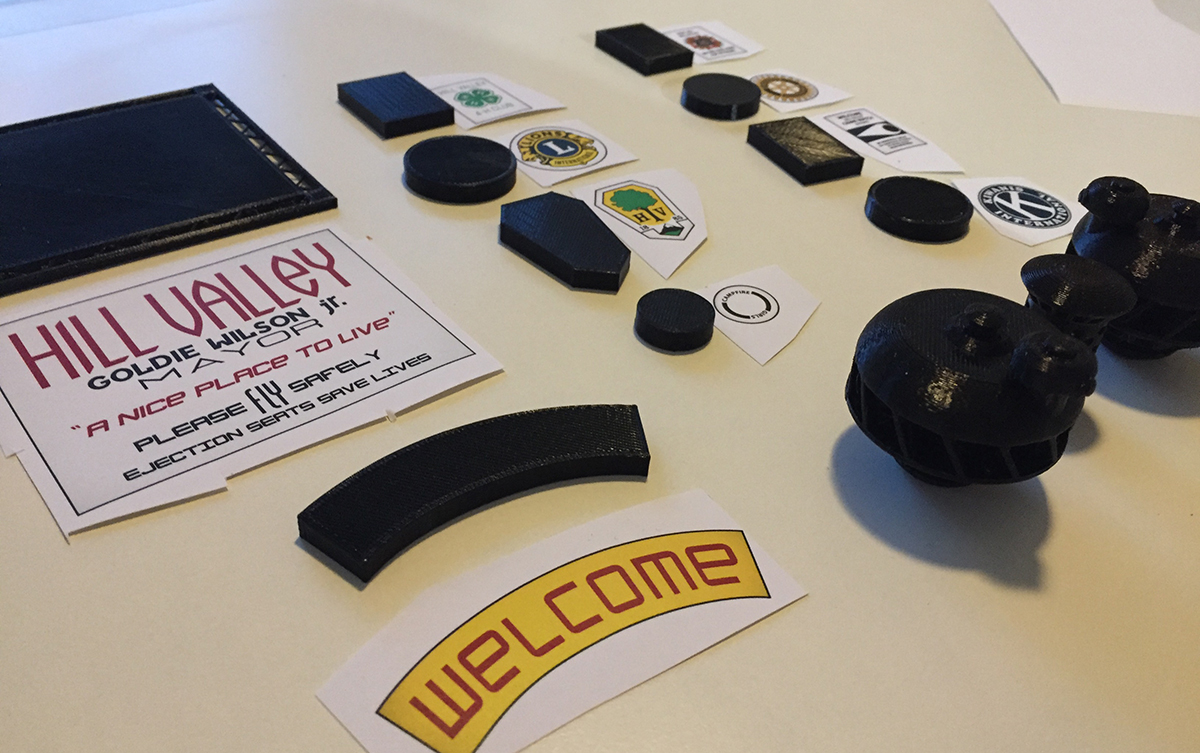
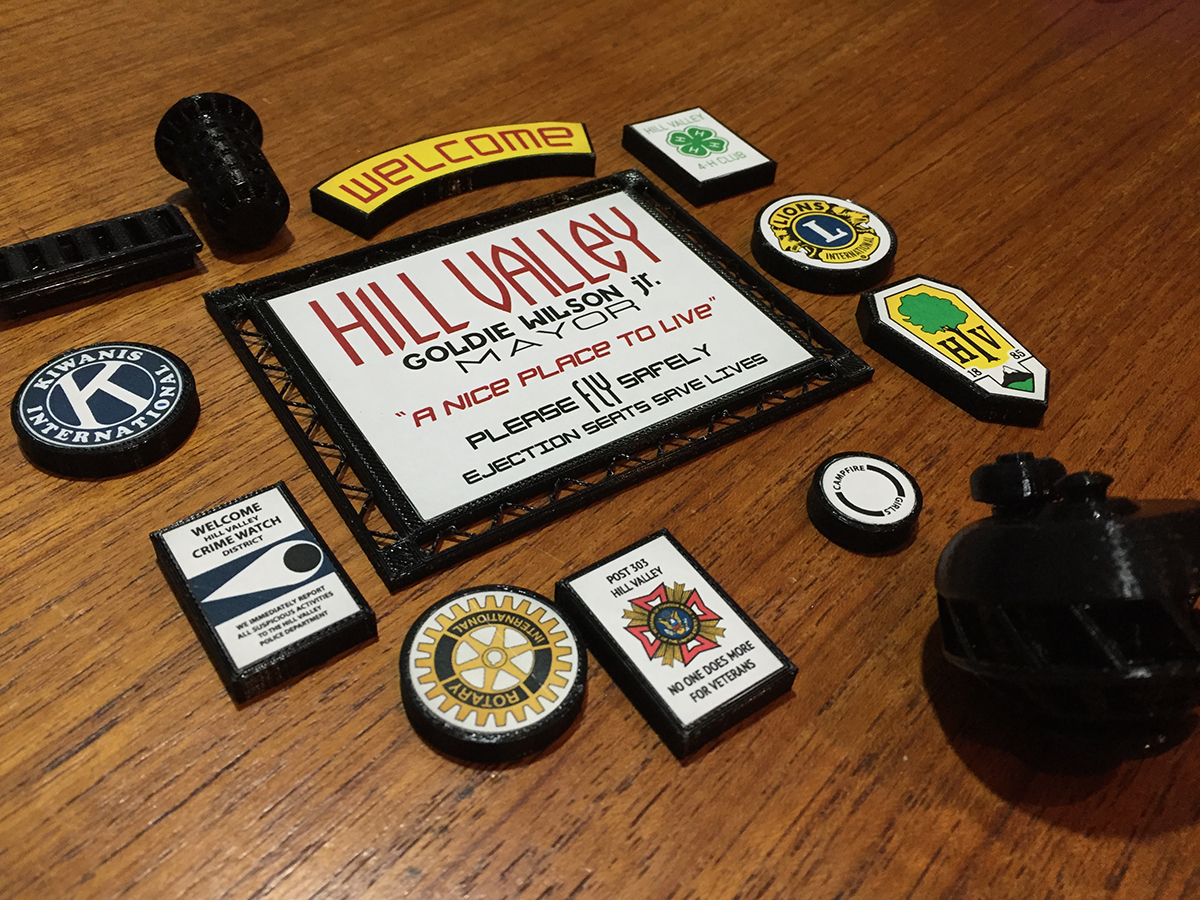
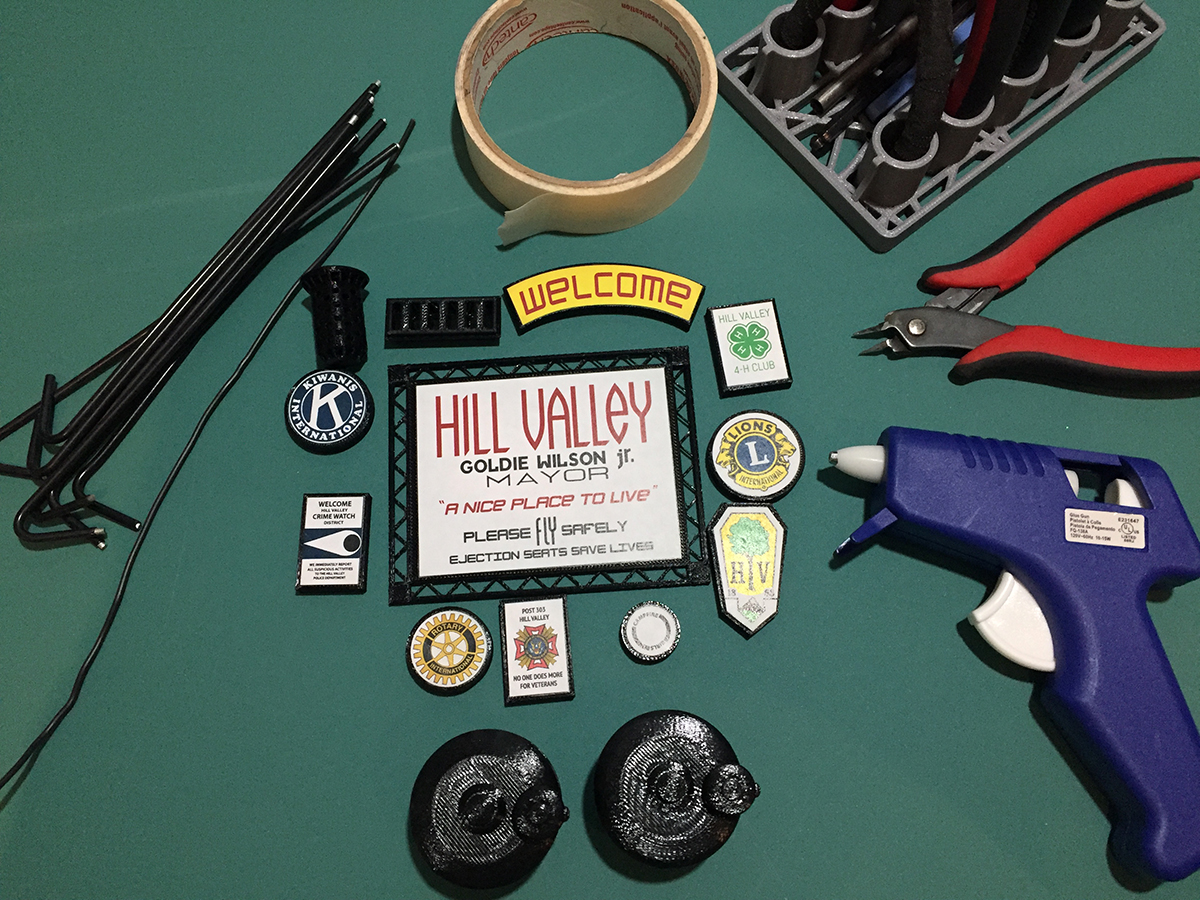
- Get Jer to 3D print the sign pieces
- Figure out the simplest way to attach all sign pieces in the right locations using as few wires as possible. At this point, I was happy with ‘looks about right’ instead of ‘screen-accurate prop replica’
- Print the sign fronts off on sticker paper
- Assemble using hot glue
- Stare for a while at how amazing the thing I just made is. (I do this every time I make something. It’s immense job satisfaction in action!)
I have deplorably few process photos of how the assembly went down
I just tracked down photos of the assembly process by digging through my photographic hoard. Wanna see?


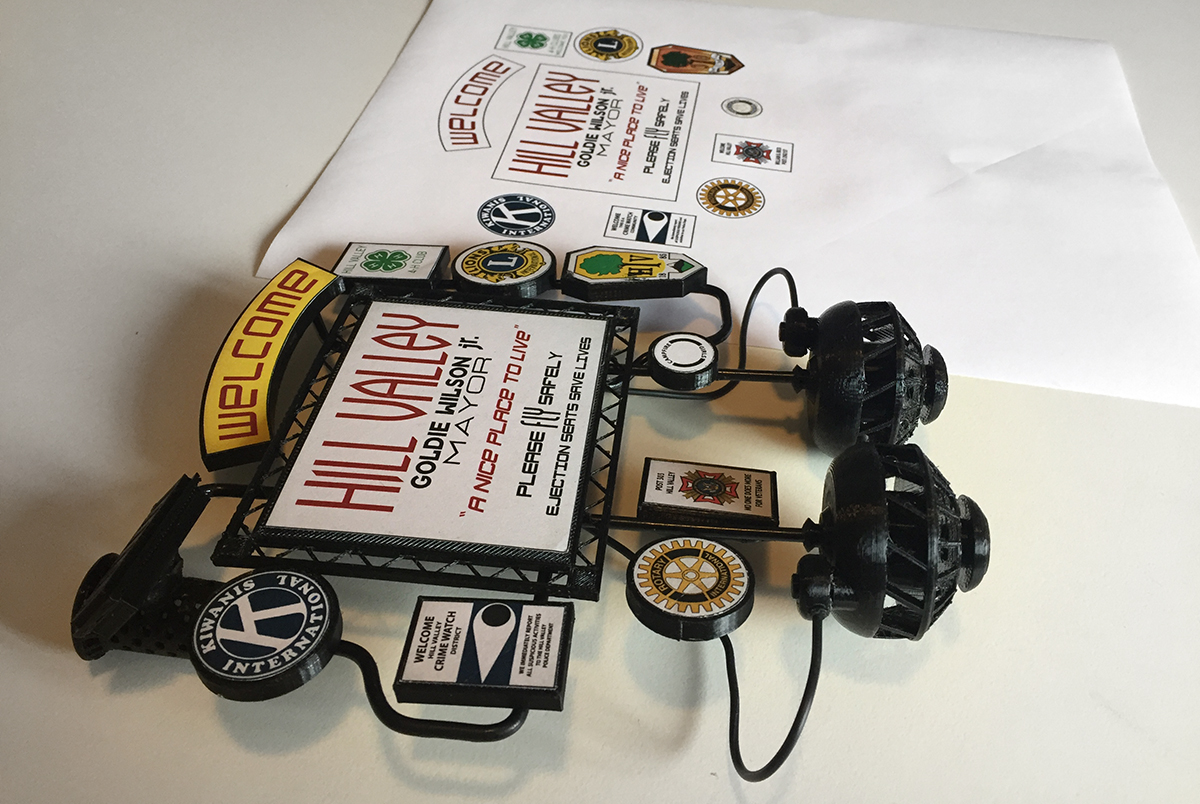

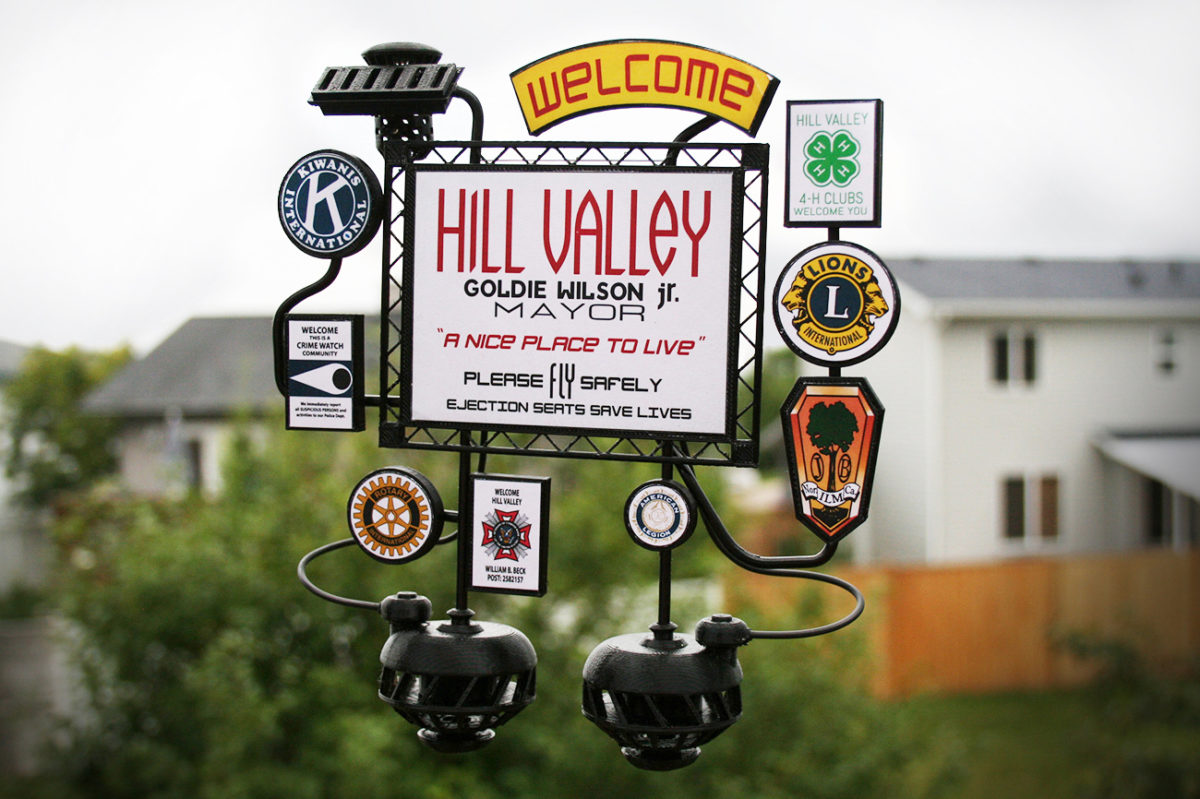
It turned out swell , even if I do say so myself:
This is for all you lovers out there.
Wanna make a sign for yourself? Well, this is your lucky day! Below are links to the CAD Files for 3D-printing, and the graphics for the signs:
Once you make your masterpiece, I’d love it if you’d reply in comments or hit me up on Instagram . I’ll be like, “Get out of town! I didn’t know you did anything creative!”

4 replies on “Making the skyway sign from Back To The Future II”
Hi Martha,
Thank you very much for posting this model, I love it. I hope you are safe and ok.
Let me aks you the size of this model, how big is it? Sorry, I haven’t got 3d printer but I would like to ask a friend if he could print it. Thank you very much in advance. Best regards from Mallorca
Hi Honorio,
I’m so glad you found (and want to make) this model! Thank you! I haven’t looked at the design files in ages, but at a rough guess, I’d say the whole thing assembled is about 8 inches by 8 inches. It’s printed as a bunch of separate parts you attach using wire.
Hope this helps!
Martha
Just plain awesomeness!
Thank you very much for sharing. 🙂
Thanks so much! I’m happy to share – hope you have fun building!